AI DAILY / 2026-09-16
Claude Code 使用技巧合集(内容未获取)
onmyway133/claude-code-tips-tricks
全文中文翻译 · AI 生成,仅供学习交流
to choose from a list of past ones. Treat each workstream as its own persistent context: one session per feature, not one giant thread for everything you touch this week. Descriptive names pay off weeks later, when you're trying to remember which session already has the context you need.
Example:
claude --resumeThen pick "oauth-migration" from the list to jump back into that work with full context intact.
Reference: Manage sessions Tip 2: Match your effort level to the task Run /effort to control how hard Claude thinks before responding. Levels range from low (fewer tokens, faster) through medium, high, xhigh, max, and auto, where Claude picks per request. The default is high on Team, Enterprise, and direct API access, and medium everywhere else. Reach for xhigh on complex coding or agentic work when you want deeper reasoning without paying the full cost of max. Save max for the genuinely hard cases: a gnarly debugging session or an architecture decision where you want Claude to think for as long as it needs. Max burns through usage limits faster, so turn it on for the session that needs it rather than leaving it as your default.
Example:
/effort xhighRefactor the auth module to support multi-tenant sessions without breaking existing token validation.
Reference: Power user tips Tip 3: Skip local file discovery for scripted runs By default, claude -p and the SDKs search your filesystem for CLAUDE.md files, settings, and MCP configs before every run. That's the right behavior interactively, but for scripted or CI usage you already know exactly what should load. Add --bare and pass --system-prompt, --mcp-config, and --settings explicitly instead, and startup gets roughly 10x faster. This local search was a default set early on, and the Claude Code team plans to flip it in a future version, so --bare is the flag worth reaching for today whenever you're calling Claude from a script.
Example:
claude -p "summarize this codebase" \
  --output-format=stream-json \
  --verbose \
  --bare
Reference: Power user tips Tip 4: Turn on Explanatory or Learning mode to study a codebase Output styles change how Claude talks, not just what it does. Set one in /config. Explanatory mode has Claude narrate the frameworks and patterns behind its own changes as it works, which is useful when you're onboarding onto code you didn't write. Learning mode goes a step further and coaches you through the change instead of just making it for you. Combine either one with a direct ask: have Claude generate an HTML walkthrough of a tricky module, draw an ASCII diagram of a protocol, or quiz you on a file until your explanation lines up with its own.
Example:
/configSet output style to Explanatory, then:> Walk me through how the request middleware pipeline works in @src/server/middleware, explaining the pattern as you go.
Reference: Power user tips Tip 5: Move sessions between your laptop, phone, and the cloud A session doesn't have to stay on one machine. Run /teleport (or claude --teleport) to pull a cloud session down and keep working from your terminal. Run /remote-control to flip that around and drive a local session from your phone or a browser instead. The Claude mobile app has a dedicated Code tab for this, and an iMessage plugin lets you fire off tasks from any Apple device without opening the app at all. If you want this available everywhere by default, turn on "Enable Remote Control for all sessions" in /config instead of switching it on per session.
Reference: Power user tips Tip 6: Turn a recurring task into a loop or a scheduled job/loop repeats a task locally on an interval for up to three days, which covers things like babysitting open PRs or closing out stale ones without you kicking it off by hand each time.
/schedule does the same job but runs in the cloud, so it keeps going after you close your laptop. The strongest version of this pattern pairs a schedule with a skill: write the workflow once as a skill, then schedule it to run on its own.
Example:
/loop 5m /babysit
/loop 1h /pr-pruner
/schedule a daily job that looks at all PRs shipped since yesterday and updates our docs based on the changes. Use the Slack MCP to message #docs-update with the changes
Reference: Power user tips Tip 7: Understand what auto mode decides for you On Pro, Max, and Team plans, auto mode is the default permission mode for interactive terminal and VS Code sessions. A separate classifier model reviews each action before it runs and approves the routine ones on its own, only stopping you for things like scope escalation, unfamiliar infrastructure, or an action that looks driven by hostile content Claude just read. You can switch modes at any point in a session with Shift+Tab if you'd rather approve everything by hand for a while. For scripted runs, pass the mode explicitly instead of relying on the interactive default, and know that a non-interactive run doesn't stop just because the classifier blocks a few actions in a row.
Example:
claude --permission-mode auto -p "fix all lint errors"Reference: Permission modes Tip 8: Track your token spend with ccusage Claude Code writes every session's token counts to local JSONL logs but doesn't surface spend anywhere on its own.
ccusage reads those logs directly and turns them into daily, weekly, monthly, and per-session usage reports, all without sending anything off your machine. It also tracks Claude's 5-hour billing blocks live, so you can watch usage accumulate against your current window instead of finding out you're close to a limit after you've hit it. Costs are estimated from public pricing rather than pulled from your actual bill, so treat the numbers as a close approximation, not a receipt. Run it with npx and no install step, which makes it easy to check on a whim or drop into a dashboard script.
Example:
npx ccusage@latest
npx ccusage@latest blocks --live
Reference: ccusage Tip 9: Organize multiple projects with a terminal multiplexer app Running several Claude Code sessions across different projects gets messy fast when they're all just tabs in one terminal window.
Muxy is a native Mac terminal built on Ghostty that groups terminals by project instead of by raw session, so each codebase gets its own space with its own tabs, split panes, and git worktrees. Its iOS and Android companion apps let you check on or drive a running session from your phone, similar to Claude's own remote control feature but at the multiplexer level instead of the session level. Muxy also ships an Agent Skill (muxy-cli) that lets Claude open projects, create splits, send keystrokes, and read pane output on its own, so a session can manage its own workspace layout instead of just running inside it.
Example:
npx skills add github.com/muxy-app/muxy/tree/main/Muxy/Resources/skills/muxy-cliReference: Muxy Tip 10: View all background sessions with agent viewclaude agents opens one screen listing every background session you have running: what needs your input, what's still working, and what's finished. Sessions group under those three headers, so you can scan a dozen tasks at once instead of opening each transcript to check on it.
Type into the dispatch input at the bottom to start a new background session right from the list, or press Enter on a row to attach and drop into the full interactive session, complete with a short recap of what happened while you were away. Press the left arrow or run /exit to detach and return to the list.
Run /background (or /bg) from any interactive session to send it to the background instead of quitting it, and /fork to split off a copy of the current conversation as a new row while the original keeps running. It's in research preview, and background sessions burn through your subscription usage the same as an interactive one: ten running in parallel costs roughly ten times what one does.
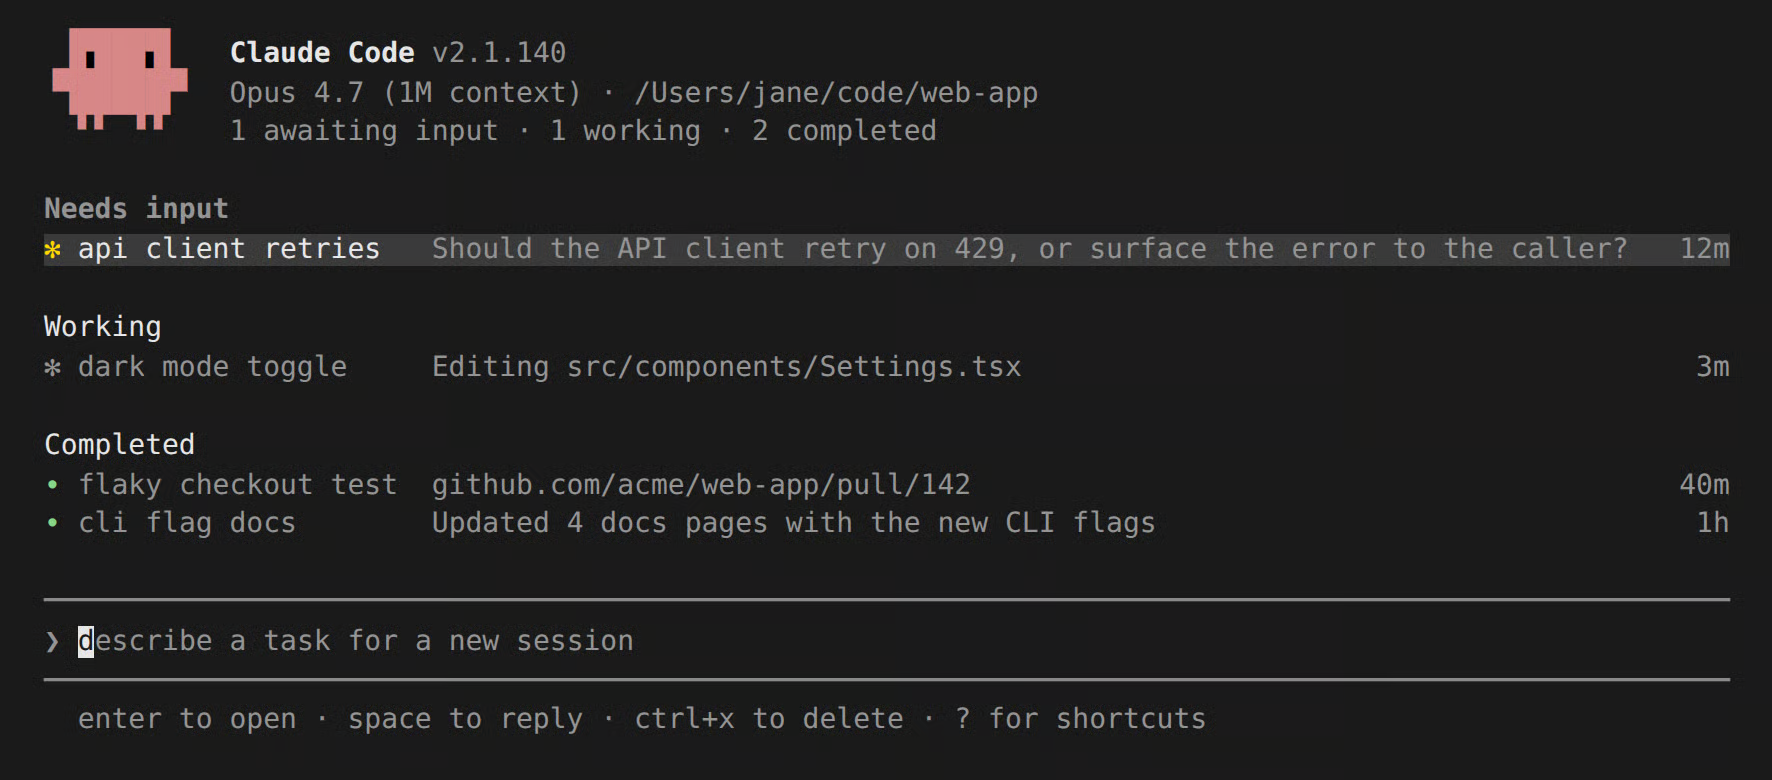
Example:
claude agentsThen type at the dispatch input:> run the test suite and fix any failures Reference: Manage multiple agents with agent view Tip 11: Install a language server plugin for real code navigation Claude Code has a built-in LSP (Language Server Protocol, 语言服务器协议) tool, but it stays inactive until you install a language server for your codebase. With one installed, Claude can jump to a symbol's definition, find every reference to it, read type information at a position, list the symbols in a file or across the whole workspace, find implementations of an interface, and trace call hierarchies. That's a step up from grep, which only matches text and can't tell a real reference from a coincidental match. The LSP tool also works quietly in the background: after every edit, it reports type errors and warnings right away, so Claude can fix them before running a full build. Anthropic maintains ready-made plugins for common languages, including typescript-lsp, pyright-lsp, gopls-lsp, rust-analyzer-lsp, csharp-lsp, jdtls-lsp, kotlin-lsp, clangd-lsp, ruby-lsp, php-lsp, swift-lsp, and lua-lsp. Install the one matching your stack with /plugin, and Claude picks it up automatically, no extra config needed.
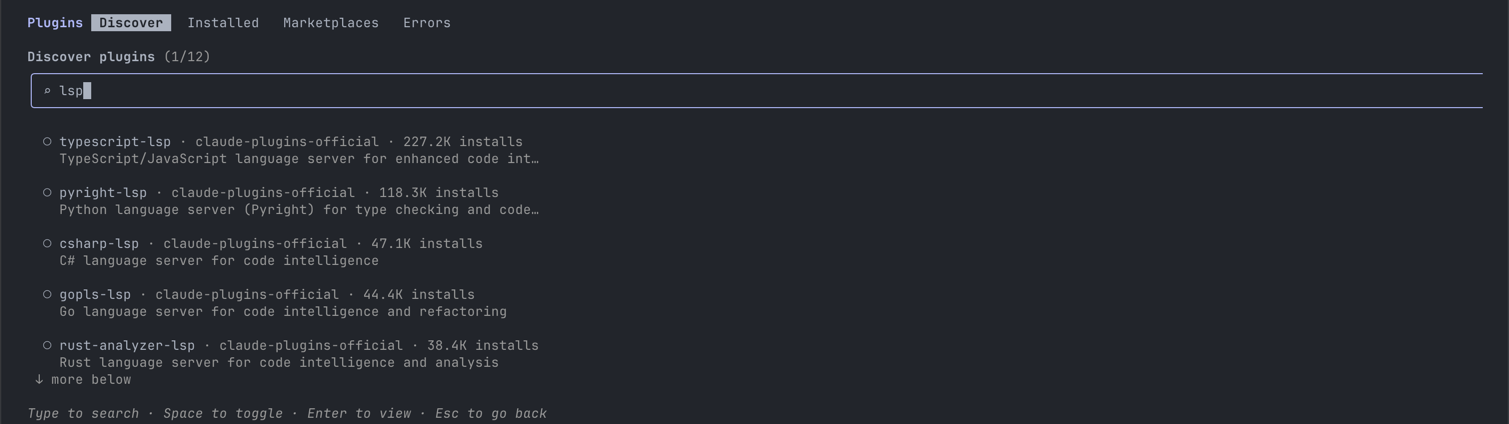
Example:
/pluginSearch "lsp" under Discover, install typescript-lsp (or whichever matches your stack), then ask:> Find every caller of formatCurrency and update the call sites to pass the new locale argument.
Reference: Tools reference: LSP tool behavior Tip 12: Check your context usage with /contextRun /context to see exactly what's filling your context window. It breaks down token usage by category: system prompt, tools, MCP servers, memory files, loaded CLAUDE.md files, and conversation history, plus how much of the window is left. This is the fastest way to catch a bloated CLAUDE.md or a memory file eating tokens before auto-compaction kicks in and summarizes your session. It also lists which CLAUDE.md and memory files are actively loaded, so you can tell what's shaping Claude's behavior right now instead of guessing.
Reach for it when a session feels sluggish, when you're not sure why context filled up faster than expected, or before starting a long task where you want some headroom left.
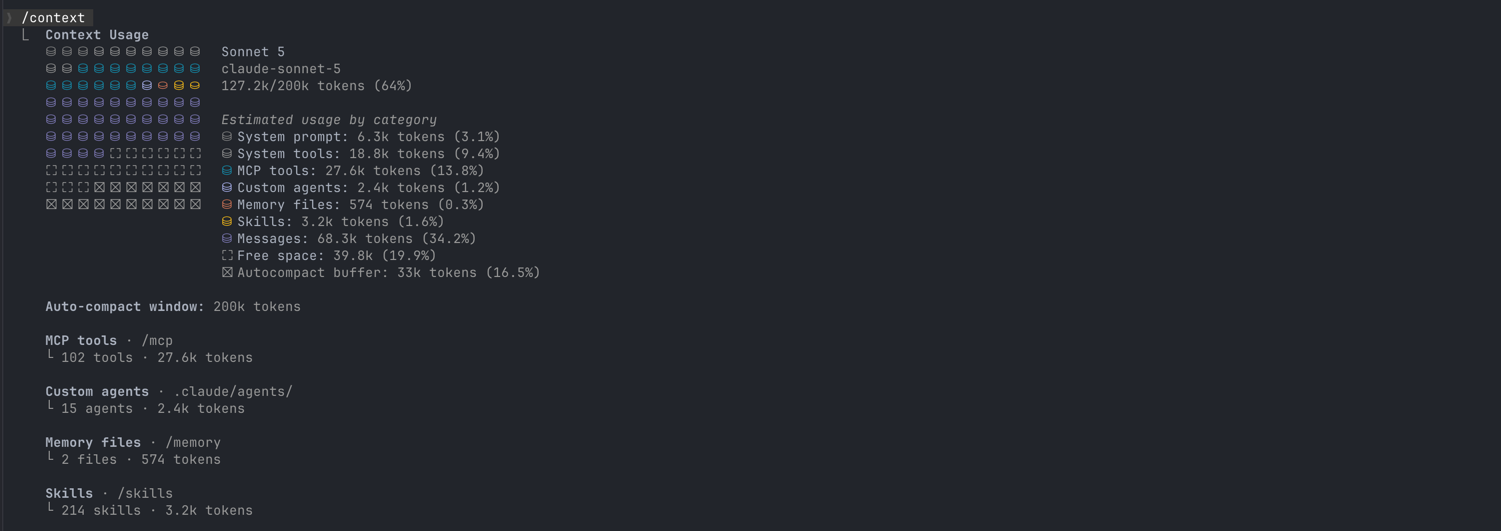
Example:
/contextReference: Context window Tip 13: Analyze your usage patterns with /insightsRun /insights for a report on how you work, not how many tokens you've burned. It looks at your recent sessions on this machine and writes an HTML report covering what you spend time on, friction points like misunderstood requests or buggy code, and features worth trying that you haven't picked up yet. A single run covers up to 200 sessions it hasn't seen before and skips very short ones; when sessions are left out, the header shows the analyzed count against the total, like 200 sessions (412 total).
The report lands at ~/.claude/usage-data/report.html, and each run keeps a timestamped copy alongside it instead of overwriting the last one, so you can compare over time. Reports follow the same cleanup schedule as other session data and get deleted after cleanupPeriodDays (30 days by default). It only sees sessions on this machine, not other devices or claude.ai, and it's not available from cloud sessions at all. Unlike ccusage (Tip 8), which parses local logs for free, /insights runs through your actual account, so a report counts against your plan or API usage like any other command.
Example:
/insightsReference: Manage costs effectively: Analyze your usage patterns
Command
Tip 1: Give Claude a standing goal for the whole session/goal sets a condition that gets re-checked after every turn, not just once at the start. A separate evaluator watches for it, and Claude keeps working across turns until the condition actually resolves, instead of treating "done" as something it only claims once. If Claude genuinely can't get there, Claude Code eventually stops the run rather than looping forever, but the goal stays set so you can pick it back up later. This is the difference between asking Claude to fix something once and asking it to keep trying until the thing is actually fixed.
Example:
/goal all tests in the payments/ directory pass and `npm run typecheck` is cleanReference: /goalTip 2: Let /batch run a migration across hundreds of files/batch interviews you about a migration up front, then fans the work out across as many worktree agents as it needs, dozens or hundreds if the change calls for it. Each agent works in its own isolated worktree, tests its own changes, and opens its own PR. You answer a handful of questions once instead of babysitting a change that touches your whole codebase file by file.
Example:
/batch migrate src/ from JavaScript to TypeScriptReference: Power user tips Tip 3: Run parallel sessions in isolated worktrees The single biggest change most engineers can make to their workflow is running 3-5 Claude sessions at once, each in its own git worktree, so they can't step on each other's file edits.
claude --worktree (or claude --worktree my-feature) starts a session in a fresh worktree, and adding --tmux gives it its own detachable terminal session too. If your version control isn't git (Mercurial, Perforce, SVN), define WorktreeCreate and WorktreeRemove hooks in settings.json to get the same isolation. Name your worktrees and set up shell aliases to jump between them, or you'll quickly lose track of which terminal is doing what.
Example:
claude --worktree auth-refactor --tmuxReference: Hooks Tip 4: Pre-approve the commands you already trust Instead of choosing between approving every single action or skipping permissions entirely, run /permissions to allowlist the commands you already trust, then check that list into .claude/settings.json for your whole team. It supports real wildcard syntax, so a rule like "Bash(bun run *)" or "Edit(/docs/**)" covers a whole category of actions at once. Everything you add is additive to the small set of safe commands Claude Code pre-approves out of the box, and the result is an auditable allowlist instead of a black box.
Example: .claude/settings.json
{
  "permissions": {
    "allow": [
      "Bash(bun run *)",
      "Edit(/docs/**)"
    ]
  }
}
Reference: Power user tips Tip 5: Sandbox risky commands instead of prompting for each one/sandbox opts you into Claude Code's open source sandbox runtime, which isolates both the filesystem and the network on your own machine. You get three modes: sandboxed with auto-allow, sandboxed with regular permission prompts still on, or no sandbox at all. This cuts the number of prompts you see while actually improving safety, since a sandboxed command that goes wrong can't reach outside its box in the first place. It's worth turning on before you turn on auto mode, not instead of it, since the two solve different problems.
Reference: Power user tips Tip 6: Script Claude into CI and pre-commit hooksclaude -p "prompt" runs Claude non-interactively and still creates a resumable session unless you pass --no-session-persistence. Pick your output format based on what's downstream: plain text for a one-off query, --output-format json for a single object you can parse, or --output-format stream-json for one JSON event per line when you want to process output as it arrives. This is what turns Claude Code into something you wire into a pipeline rather than something you only run by hand.
Example:
claude -p "list all API endpoints" --output-format jsonReference: Headless mode Tip 7: Bootstrap CLAUDE.md with /init instead of starting from a blank file/init is an interactive slash command you run inside a session, not a terminal command. It scans your repo, build files, and configs, then drafts a starter CLAUDE.md with the build and test commands, directory layout, and conventions it can infer on its own. Run it again later and it proposes edits to your existing CLAUDE.md instead of overwriting it.
Treat the output as a first draft, not a finished file: it can't guess deployment steps, business rules, or team conventions that live only in people's heads, so add those yourself before committing it. Once it's in, keep improving it the way the Workflow tips below describe, catching a mistake and writing the fix back into the file so the whole team benefits from it.
Example:
/initReference: CLAUDE.md files Tip 8: Be aware of ultra features Claude Code has picked up several features named around "ultra," and they're easy to mix up since only one of them is a slash command in the usual sense.
/code-review ultra (aliased /ultrareview where available) is a research-preview command that sends a branch diff or GitHub PR to a fleet of reviewer agents running in a remote sandbox, with every finding independently reproduced before it's reported back, a heavier and slower tool than the local /code-review.
/effort ultracode is a session setting, not a model effort level: it pushes reasoning to xhigh and turns on automatic workflow orchestration so Claude plans and executes multi-step tasks with its own dynamic subagent workflows.
It's easy to assume "ultracode" also works as an inline prompt keyword the way other effort boosts do, but it doesn't. That inline trigger is a different word, ultrathink, which asks for deeper reasoning on just that one turn without touching your session's effort setting at all. And if you're looking for /ultraplan, stop: Anthropic retired the command, its keyword trigger, and the plan-approval dialog option that used to launch it, pointing people toward Plan Mode or Claude Code on the web instead.
See tips/ultra-features.md for a full comparison table, including model and account requirements for each.
Example:
/code-review ultra
ultrathink: find the root cause of the race condition in the connection pool, then fix it
Reference: Ultrareview, Model configuration
Agent
Tip 1: Define reusable subagents instead of re-explaining a role every time Drop a markdown file into .claude/agents/ with a name, description, and optionally a restricted tools list, and you have a reusable subagent you can invoke with claude --agent=<name> or let Claude reach for on its own. A read-only agent scoped to just the Read tool is a common one to keep around for safe exploration of unfamiliar code. Boris Cherny keeps a small library of these for jobs he runs often, a code simplifier, a build checker, a test runner, each one starting from a clean context and returning just a result.
Example: .claude/agents/ReadOnly.md
name: ReadOnly
description: Read-only agent restricted to the Read tool only
tools: Read
You are a read-only agent that cannot edit files or run bash.
Reference: Subagents Tip 2: Delegate research to a subagent to keep it out of your context Context is the real constraint in a long session, and exploration is usually the biggest cost against it. Tell Claude to use a subagent to investigate something, and that research happens in a separate context entirely, leaving your main conversation focused on implementation. This matters most on an unfamiliar codebase, where the alternative is burning through half your context window finding the right files before you've written a line of code.
Example:> Use a subagent to investigate how our existing rate limiter is implemented and where it's used, then summarize the findings before we touch anything.
Reference: Subagents Tip 3: Have a fresh subagent grade the work before you call it done The longer a run goes unattended, the more it matters that something other than the agent that did the work checks it. Before treating a task as finished, have a subagent review the diff in a fresh context with only the diff and your criteria, not the reasoning that produced the change, so it isn't grading its own homework. Claude Code ships a /code-review skill that does exactly this: it reviews the current diff in a fresh subagent and reports findings back to your session.
Example:
/code-reviewor write your own criteria:> Spin up a subagent with only the current diff and this checklist: no unhandled errors, no new dependencies, tests cover the new branch. Report gaps, don't fix them.
Reference: Subagents Tip 4: Batch large changes across worktree-isolated a